Showing posts with label craft. Show all posts

Tuesday, January 4, 2011

Handmade Holidays 2010

With more limited time this year (that or a lack of motivation to pull several 2am evenings again) and dividing my sewing and "creative" attention elsewhere, Christmas 2010 was not at all as grand as 2009 and the dress-ups, but still enjoyable. And I got a bit more sleep.

Christmas PJ's:
More PJ's:
Chocolate Plate: Done in Vinyl
Poopy Clutch and Nursing Cover:
For an expecting momma, of course

Postcard Set:
I converted some drawings of Jack and Elyette's into 4x6 photos and mounted them to some postcard backing purchased here.

Animal Pillows:
For Charlotte: Made from terry cloth and flannel scraps. All I had to buy were the felt buttons. Elyette helped me stuff them.

She also did some of her own handmade gifts:

Busy making fleece scarves entirely by herself (oh and bead necklaces).

Dr. Kit:

This one is my favorite. I've wanted a Dr. Kit for the kids but not willing to fork out for those plastic kits. I wanted a real working stethoscope for them. So I got a pediatric blood pressure cuff with a stethoscope for $15 on ebay. Got Some bandaid, ace wrap, etc. Made a bag out of felt (lined with felt to, so nice and sturdy) on hand and viola! Dr. Kit for less than $20.

K, I think thats it. Hope all had a great Christmas!


Monday, October 25, 2010

Candy Corn Dresses

I've never been a big fan of candy corn... 'til now!
I'll take 'em this way any day.

Tuesday, July 20, 2010

Adventures in Swimwear


In my frustration to find swimwear for my postpartum bod (as if it isn't hard enough, without all the... shall we say: extras?) I made grand plans to make myself one instead. Well, that hasn't panned out as of yet, nor is it likely too, but I did get to give it a go for my favorite model!

Ain't she cute? This really came about because I had a bunch of scrap white Lycra fabric that I made Elyette some "booty" shorts from for her to wear under her play skirts this summer (way too hot for leggings). I still had plenty left, so why not make a tankini top to go with?

She makes anything look cute. And a white swimsuit is SO practical... ha.

Thursday, June 24, 2010

Reclaiming Naptime: Patriotic Pom-poms

I've been very lucky lately and granted couple of days this past week with ALL 3 kids napping (well, Elyette was having "quiet" time) at the SAME time!!! Did I get the laundry folded or clean the bathrooms... NAH! I blew off the responsible thing and CREATED instead. And this time even you get to benefit from my hour of freedom.

I give you:

PATRIOTIC POM-POMS

Super easy, fast, and cheap... free actually(just use scraps). Now, obviously you can use any colors you want, but we made our for the 4th of July cause we thought they resembled fireworks.

Make them any size and fullness you'd like and put them on hair clips, headbands, T-shirts, flip flops, bags, ANYTHING.


Here's how to make 'em:

Materials:
-Scrap fabric (you don't need much)
-Scissors
-Thread

Yep, that's it!

Step 1: Select Fabric

You can use any old fabric that won't horribly unravel on you. I used a lightweight denim (blue), quilter's cotton and broadcloth (red), and a linen blend- from an old skirt (white). Next time I think I might try to make some from an old T-shirt.

Step 2: Cut Strips
Cut 1/2" strips on the bias* however long you can. The bias is basically on the diagonal where the there is the most stretch. This makes it so that if and when the fabric frays on the edges it will do so uniformly on either side and won't twist (we do want some fraying for interest and character).

*You can also cut strips straight on the selvage (its the side that doesn't fray much) if you want a little twisting action (but you may want to fray check the tips- the edge that isn't on the selvage if you do it this way)

Step 3: Wrapping
Once you have all your strips cut, begin wrapping them around a stable flat object (like a notecard) that is about the width you'd like you pom-pom to be. For example, I used a 5" wide tupperware lid for my largest one and 3 1/2" wide notepad for my slightly smaller ones.
If you are mixing fabrics like I did, alternate them as you warp them on. You strips of fabric are likely all different lengths and may not wrap many time. Don't worry about that. Just try to hold them all together as you wrap. You can trim it up later.

Step 4: Tie it off

After wrapping as many strips as you'd like for fullness its time to tie it up in the center. Thread a needle. At least double up the thread, I would recommend quadrupling it for more strength, or use a thicker floss. Before removing the wrapped strips, tightly wrap the thread around one side of the strip bundle in the center and tie (this will help keep it from falling apart when you pull it off). Gently slide the whole bundle off the object you wrapped it around. As tightly as you possibly can, wrap the remaining thread around the center of your bundle and tie off.

Step 5: Cut Loops
Once secured, take your scissors and cut the loops (several at a time works fine). Trim it up and even it out as much as you'd like and VIOLA, a pom-pom.

Step 6: Wet and Dry (optional)
They're cute without this step, so its up to you... First, spray the pom-pom with water to dampen it. Then throw it in the dryer (with other things if possible, so it doesn't flatten oddly). Promptly remove from dryer when done. This with fray up the edges and give a little interest to the fabric. I personally liked this "messy" look and ended up doing it to all of my pom-poms.

Attach pom poms to whatever you'd like. Enjoy!

Tuesday, May 4, 2010

Easter Ensembles

K, time to share this years Easter/Spring ensembles. Rather after the fact, yes... especially since I made them BEFORE Charlotte's arrival (unlike my amazing sister, Elisa, who made her 3 daughters' Easter dresses right AFTER the arrival of her 4th daughter last year!)

Up first:

Jack
- Cotton tie: Adapted from a pattern found at Ottobre Design (scroll through the pic to find the necktie- this tie is rather narrow and only big enough for a baby boy I think, so Jacks is a wider, longer version, but the method the same)
- Daddy got a matching tie from the scraps (Not pictured, sorry- used an old tie as my pattern and swiped the interfacing from it too). BOZ's request, NOT mine. I'm a dork, but not so dorky I'd expect my husband to wear a matching clown tie with his son. They looked cute though.

Elyette:
As always, she was the inspiration for all of their Easter digs. "Twirlability" is a must and she wanted Aqua blue, so that, cream and peach were my color palette. Ridiculous ruffles is what we ended up with :)

Ruffle Dress
: So basically I have this one simplicty pattern (#2989) I almost always as my "base" (like for this, this, and this dress), so of course I used it again, with adaptations of course. I love the fabrics I found to use. The blue is a swiss dot with embroidered ends and the floral is a larger swiss dot. Love the textures.

Bolero
: Again used the bodice of that simp pattern to get the size right and winged it from there

Flower headband
: These flowers were fun and EASY. Maybe I'll have to do a tutorial for them sometime.
Charlotte:
I was excited that this actually fit her! And I went all out, complete with bloomers and booties (that of course always fall off)

Slim Jr. Dress
: Adapted from another basic simplicity pattern (pattern included bloomers-sorry couldn't find it online anymore for a link)

Flower headband: Same as Elyette's. I made the flowers, added beads and attached to an existing headband of stretch lace (anyway know where I can find some of that stretchy lace?)

Booties
: Made from Heather Bailey's bitty booty pattern.

Tuesday, March 16, 2010

Nesting

I wish my nesting instinct was to scrub down the whole house and disinfect everything, but when the energy spurts come, I sew. My excuse is that deep cleaning is just too physically difficult and exhausting at this point to make the effort, but then moving around on the floor to cut stuff out definitely got a bit more challenging the last few weeks. Anyway, here's something I did before the "I've fallen and can't get up" phase hit:We've been making over Elyette's room with a bunch of fun projects (just 2 more little ones to go... for now :)... and then we'll share our efforts). And since she's excited to share a room with her baby sister we went on a mission to find or make baby bedding that would coordinate with her room. It was actually a much more stressful and challenging task then I thought, but after weeks of hunting (online and in stores) we found some fabric that we finally felt worked well enough (and in my budget!).

I made the crib sheet using this tutorial (FYI- if you try it, I recommend making it just a tad bigger), the bumper I made as a slip cover for the existing one I had for Jack and the quilt I HAD to splurge a little and border and back it with minky fabric... ah SO SOFT!

So anyway, there you have it, the "baby's nest" of Elyette's room... soon to be "the girls' room" :). Hmm... thanks to this and few other "girly" creations, Lets hope it really is a girl! haha... Anyone in want of some handmade baby girl items if not?

Wednesday, March 3, 2010

Missing Fabmo

If you're in the Bay Area take advantage of Fabmo for me! Fabmo, in a nutshell, started with a couple up in Palo Alto taking discontinue fabric samples and such from the interior design community and offering them free of charge to the public for re-purposing. Its pretty awesome.

Thanks to my last visit to Fabmo before moving I have a new rocker for only $12! And I also got to use my new staple gun Boz got me for Christmas!

Before: (old, cheap, blah, rocker, we picked up at Walmart for $75 when we had Elyette)

Now a bit more appealing: (though I have to be honest and admit I don't find rockers to be "good looking" chairs by any means, but it does the job)

Though I scored on finding a sample large enough, I still only had enough Fabmo fabric to cover the front of the chair so I had to buy some fabric for the back. Here's the tab:

Blue Fabmo Fabric for front: $0
1 1/2 yrds clearanced blue microsuede for back: $4.50
Extra batting for added comfort :): $7

Accent pillow was also made from fabmo fabric and I stuffed it with batting from an old pillow I kept on hand. Not bad, eh?

Wednesday, February 17, 2010

Rare photos.... BEWARE

A while back I intended to make a post on some Maternity dresses I made myself in November, but was seriously pouting over the finished product photos :)- Ha, I've said it before, pregnancy doesn't look good on me.

Well, whatever, I'm letting them loose anyway. Here's to honesty: I'm 35 weeks pregnant, 45 lbs heavier (gasp, I know), exhausted, out of breathe, whiny, "uncomfortable" (in pain would be closer to the truth), and completely and totally elated and excited to meet this little one, I can hardly stand it! There you have it. Now here's to photos you are lucky to see :)...

Retro Knit dress: modeled at 31 weeks preggo
Made from simplicity pattern 2956. Only altered to be maternity and added a ruffle on the hem.I can't take myself seriously, sorry...

Navy Dress: modeled a 24 weeks preggo (or so)
Also adapted from simplicity pattern 2956. Well, basically the sleeves are from the pattern, I altered the bodice almost entirely and did my own maternity friendly skirt.
Mini-me's Navy Dress (she posed first :)):
No pattern, but used a knit dress of hers for size guidelines. What you can do with a little extra fabric... I love her dress

Now here is what happens when you forget to pre-wash your knit and grow 10 weeks more pregnant (not a favorable combination I might add):

Navy Dress revisited: modeled at 35 weeks preggo
Since I failed to pre-shrink my fabric, I had to add some lace trim to the hem to make it suitable to wear again...
Mini-me's is still darling. Even better shrunken up a bit :)... Ah cute girl. Makes feeling like a whale all worth it :)...

Oo, and I have a bunch of that retro knit leftover and of course Elyette wants another "mini-me" dress. Any ideas?

Wednesday, February 3, 2010

Etched Glass Silhouettes

There are a lot etched glass tutorials out there, but I thought I'd add ours to the mix: Etched Silhouettes.

We made Christmas ornaments from beveled glass rectangles, but you could also easily do this on say a mirror, vase, candle holder, jewelery box, anything glass really. I think they make awesome gifts (FYI: V-days just around the corner!... although I think they are perfect for Mother's/Father's Day).

What you'll need:
-Glass object to etch
-X-acto knife
- Contact paper
- Etching cream
- Old paintbrush/sponge piece/Popsicle stick, etc. (to spread the cream with)
plus a pen or pencil and a camera

Step 1: Take photo
Take a picture of your subject with bright back lighting.
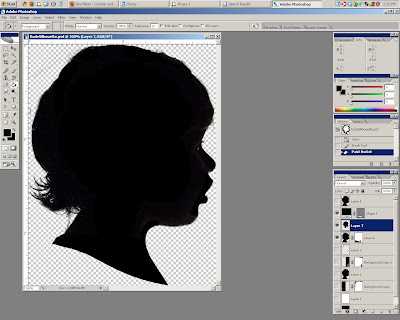
In a photo editing program (we used photoshop) bring up the contrast on your photo. (We did a bit more to clean it up, but its really can do fine with little to nothing... as long as you can see it well enough).


Size the photo to fit your glass object and print.

Step 2: Trace Silhouette

Place your contact paper (still intact) over your printed silhouette image and tape it down.
Using a pen or pencil trace your silhouette onto the contact paper. In order to see the silhouette you'll probably need some back-lighting. You could place it up in the window and trace, but for more precision, and it was nighttime :), I improvised by placing a glass cutting board over a desk lamp that I sat in my lap and traced out on that (WARNING: The bulb got hot and made the cutting board hot so I did periodically have to stop and let things cool).

Step 3: Cut it out
Once you're satisfied with your tracing job, position the contact paper onto your glass object. Peel the paper backing of the contact paper and carefully place it on the glass object and smooth it out well! The nice thing about glass, unless you're doing this on a mirror, that you can turn it around and check the back for bubbles.

Next, start cutting. Carefully cut around your silhouette with an X-acto knife. For small tricky spots, but sure to cut IN toward the center of the silhouette since you'll be peeling this part away anyway.
Using a pin or tip of the X-acto knife, carefully pull up the edge of the silhouette and slowly peel it away. Use the pin to get up any small pieces left behind. Hold the silhouette back and make sure it actually looks like the person your etching :).

If you are adding a name do this next using the same method as the silhouette. Since we made so many of these and the text would have been quite small, I bought custom made name stencils for $1 here, to save my self some labor and pain. If you are doing your own text, keep it simple! Curly cues, lots of serifs, etc. is just asking for trouble.
Cover as much of the glass object as you can to protect it (with tape or contact paper).
Again, double check the back for bubbles.

Step 4: ETCHING!

Once you've placed and peeled your text, covered the glass and everything looks satisfactory its time to etch! Be sure to use a well ventilated space, protect the surfaces your are working on and wear gloves.
Shake your bottle of etching cream. Slather on the etching cream using an old paintbrush, sponge, Popsicle stick or something else you don't mind trashing. Make sure you have a good thick layer covering everything. Leave the cream on for 5-10 minutes.

Now I tried a few methods of brushing it on, like, moving it all around while its etching, but I found that if I just brushed in on in one basic direction and let it sit it came out smoother (but then it could have been just my cream- it did seem rather clumpy).

Step 5: Rinse and Dry

After 5-10 minutes of etching rinse the cream off thoroughly with warm water. FYI- Don't freak out if it looks like it didn't etch at all, you won't see the etching when its wet. Pat glass dry and peel off the tape and contact paper to reveal your masterpiece!

and DONE!