There are a lot etched glass tutorials out there, but I thought I'd add ours to the mix
: Etched Silhouettes.
We made Christmas ornaments from beveled glass rectangles, but you could also easily do this on say a mirror, vase, candle holder, jewelery box, anything glass really. I think they make awesome gifts (FYI: V-days just around the corner!... although I think they are perfect for Mother's/Father's Day).
What you'll need:
-Glass object to etch
-X-
acto knife
- Contact paper
- Etching cream
- Old paintbrush/sponge piece/Popsicle stick, etc. (to spread the cream with)
plus a pen or pencil and a camera
Step 1: Take photo
Take a picture of your subject with bright back lighting.
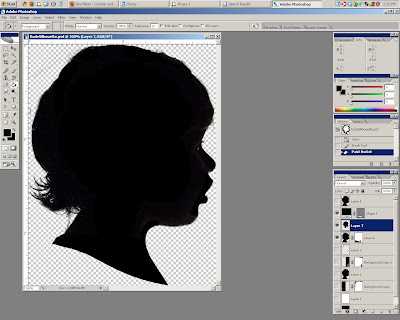
In a photo editing program (we used
photoshop) bring up the contrast on your photo. (We did a bit more to clean it up, but its really can do fine with little to nothing... as long as you can see it well enough).

Size the photo to fit your glass object and print.
Step 2: Trace Silhouette
Place your contact paper (still intact) over your printed silhouette image and tape it down.

Using a pen or pencil trace your silhouette onto the contact paper. In order to see the silhouette you'll probably need some back-lighting. You could place it up in the window and trace, but for more precision, and it was nighttime :), I improvised by placing a glass cutting board over a desk lamp that I sat in my lap and traced out on that (WARNING: The bulb got hot and made the cutting board hot so I did periodically have to stop and let things cool).
Step 3: Cut it out
Once you're satisfied with your tracing job, position the contact paper onto your glass object. Peel the paper backing of the contact paper and carefully place it on the glass object and smooth it out well! The nice thing about glass, unless you're doing this on a mirror, that you can turn it around and check the back for bubbles.

Next, start cutting. Carefully cut around your silhouette with an X-
acto knife. For small tricky spots, but sure to cut IN toward the center of the silhouette since you'll be peeling this part away anyway.

Using a pin or tip of the X-
acto knife, carefully pull up the edge of the silhouette and slowly peel it away. Use the pin to get up any small pieces left behind. Hold the silhouette back and make sure it actually looks like the person your etching :).
If you are adding a name do this next using the same method as the silhouette. Since we made so many of these and the text would have been quite small, I bought custom made name stencils for $1
here, to save my self some labor and pain. If you are doing your own text, keep it simple! Curly cues, lots of serifs, etc. is just asking for trouble.

Cover as much of the glass object as you can to protect it (with tape or contact paper).

Again, double check the back for bubbles.
Step 4: ETCHING!Once you've placed and peeled your text, covered the glass and everything looks satisfactory its time to etch! Be sure to use a well ventilated space, protect the surfaces your are working on and wear gloves.

Shake your bottle of etching cream. Slather on the etching cream using an old paintbrush, sponge, Popsicle stick or something else you don't mind trashing. Make sure you have a good thick layer covering everything. Leave the cream on for 5-10 minutes.
Now I tried a few methods of brushing it on, like, moving it all around while its etching, but I found that if I just brushed in on in one basic direction and let it sit it came out smoother (but then it could have been just my cream- it did seem rather clumpy).
Step 5: Rinse and Dry
After 5-10 minutes of etching rinse the cream off thoroughly with warm water. FYI- Don't freak out if it looks like it didn't etch at all, you won't see the etching when its wet. Pat glass dry and peel off the tape and contact paper to reveal your masterpiece!

and
DONE!

 Yep, we bought a minivan. A 2006 Honda Odyssey. The last car we bought was before we got married and it has served our family well, but alas loyal little Hyundai just couldn't fit 3 car seats in the back and still have the doors shut so we finally surrendered.


